


Custom Printed Cups: A Practical Ordering Guide
You're staring at three supplier quotes for custom printed cups. The unit prices are easy to compare, but the hidden risks sit elsewhere: a logo that shifts between production runs, a seam that leaks during service, a substrate that fails your sustainability promise, or a delivery that reaches stores after the launch.
Treat the order as a multi-stakeholder rollout, not a print job. Design owns the artwork, procurement owns the commercial terms, compliance owns food-contact and chemical documentation, and store operations owns fit, storage, staff handling, and customer experience. The cup touches all four functions before the first drink is poured.
Table of Contents
- Why Custom Printed Cups Are a Real Operations Decision
- Preparing Artwork That Survives Production
- Matching Printing Method to Your Order
- Minimums, Lead Times, and Proofs Without Surprises
- Substrates, Inks, and Sustainability Claims You Can Stand Behind
- Rolling Out Custom Cups Across Multiple Locations
- The Custom Printed Cups Decision in One Page
Why Custom Printed Cups Are a Real Operations Decision
A buyer who selects the lowest quote without checking the specification can create work for every department. A cheaper cup may require a different lid, occupy more storage space, arrive in inconsistent colors, or force stores to explain an environmental claim that the documentation doesn't support. The cost line is only one part of the decision.
The scale makes this important. Industry estimates place global disposable-cup production and use at about 250 billion cups annually, with most single-use cups ending up in landfill after use, as summarized by Rainbow Cups' overview of branded disposable cups. In the UK, paper-cup consumption is estimated at around 7 million per day, producing roughly 30,000 tonnes of waste each year according to the same industry source. A cup is small, but a chain's specification multiplies across every location and service period.
Operational rule: Never approve a cup quote until the artwork, substrate, lid fit, compliance file, delivery plan, and acceptance criteria are attached to the same purchase decision.
The historical role of the cup also explains why branding matters. Paper cups moved from early public-water applications into railroads, theaters, hotels, and department-store soda fountains during the early twentieth century, turning a disposable container into part of the hospitality experience. Today, buyers looking for branded coffee cups with lids should assess the complete service system, not just the printed surface.
Bring compliance into the first supplier conversation. India's FSSAI guidance says printed surfaces must not directly contact food, while European food-contact materials must comply with Regulation (EC) No 1935/2004. For teams comparing alternative materials, the plastic-free cup range is a useful reference point for how coating and construction choices affect the specification.
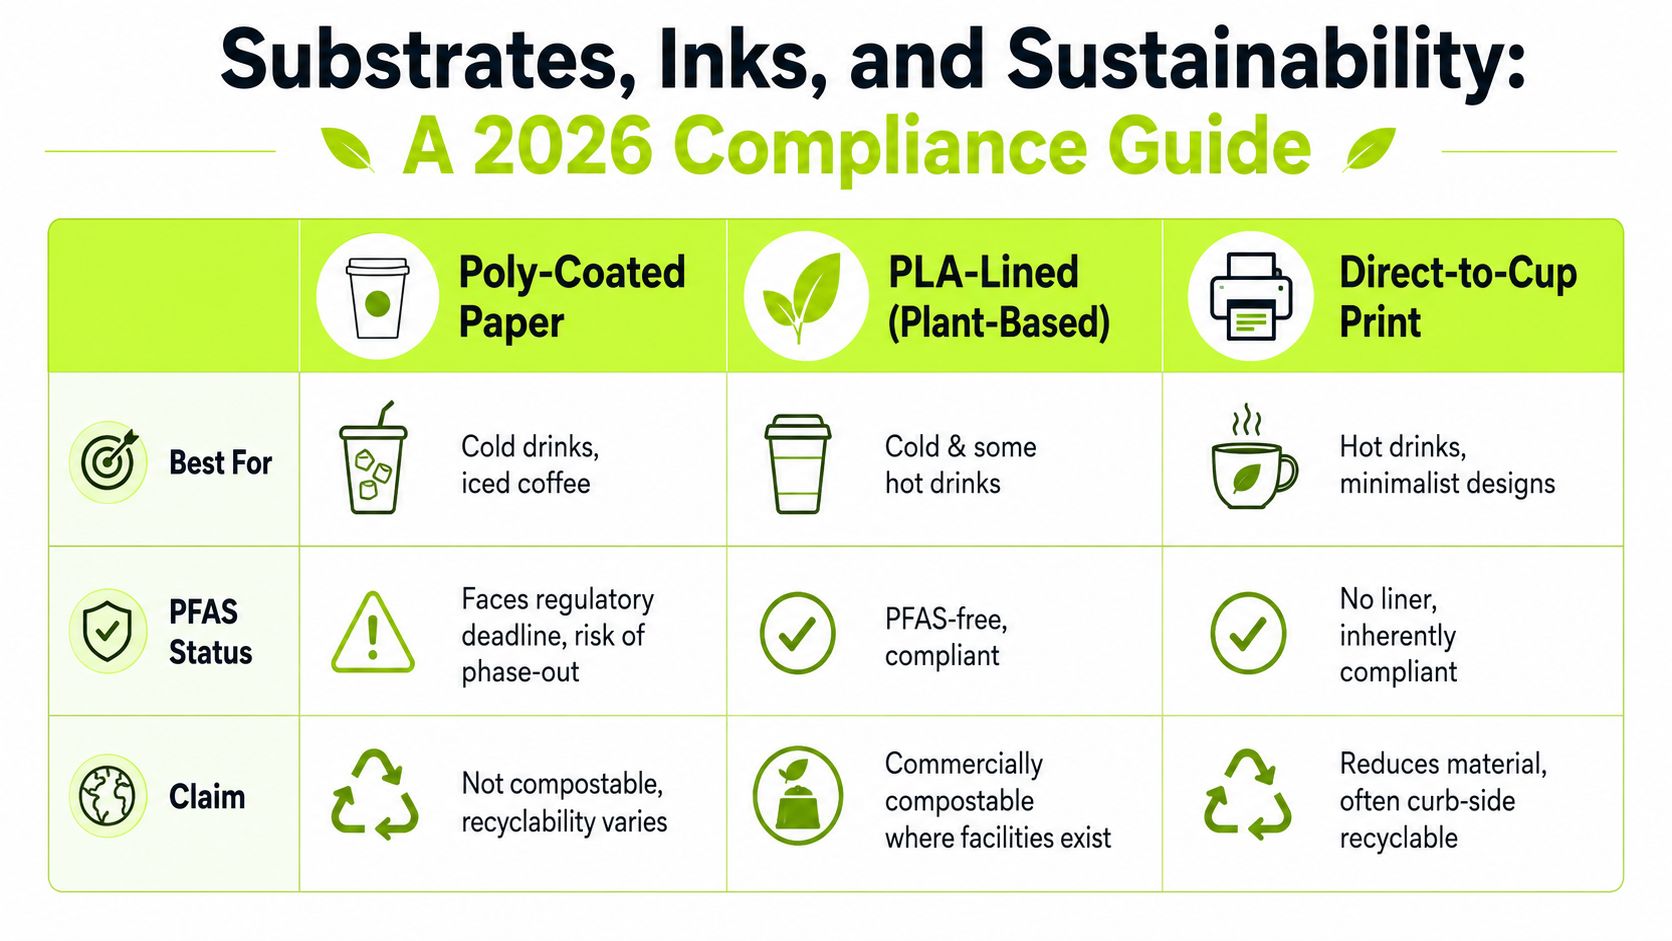
The 2026 PFAS deadline adds another filter. EU packaging rules restrict PFAS in food-contact packaging from 12 August 2026, according to the regulatory buyer guidance. If your brand sells across markets, material qualification belongs in the initial brief, not in a late-stage legal review.
Preparing Artwork That Survives Production
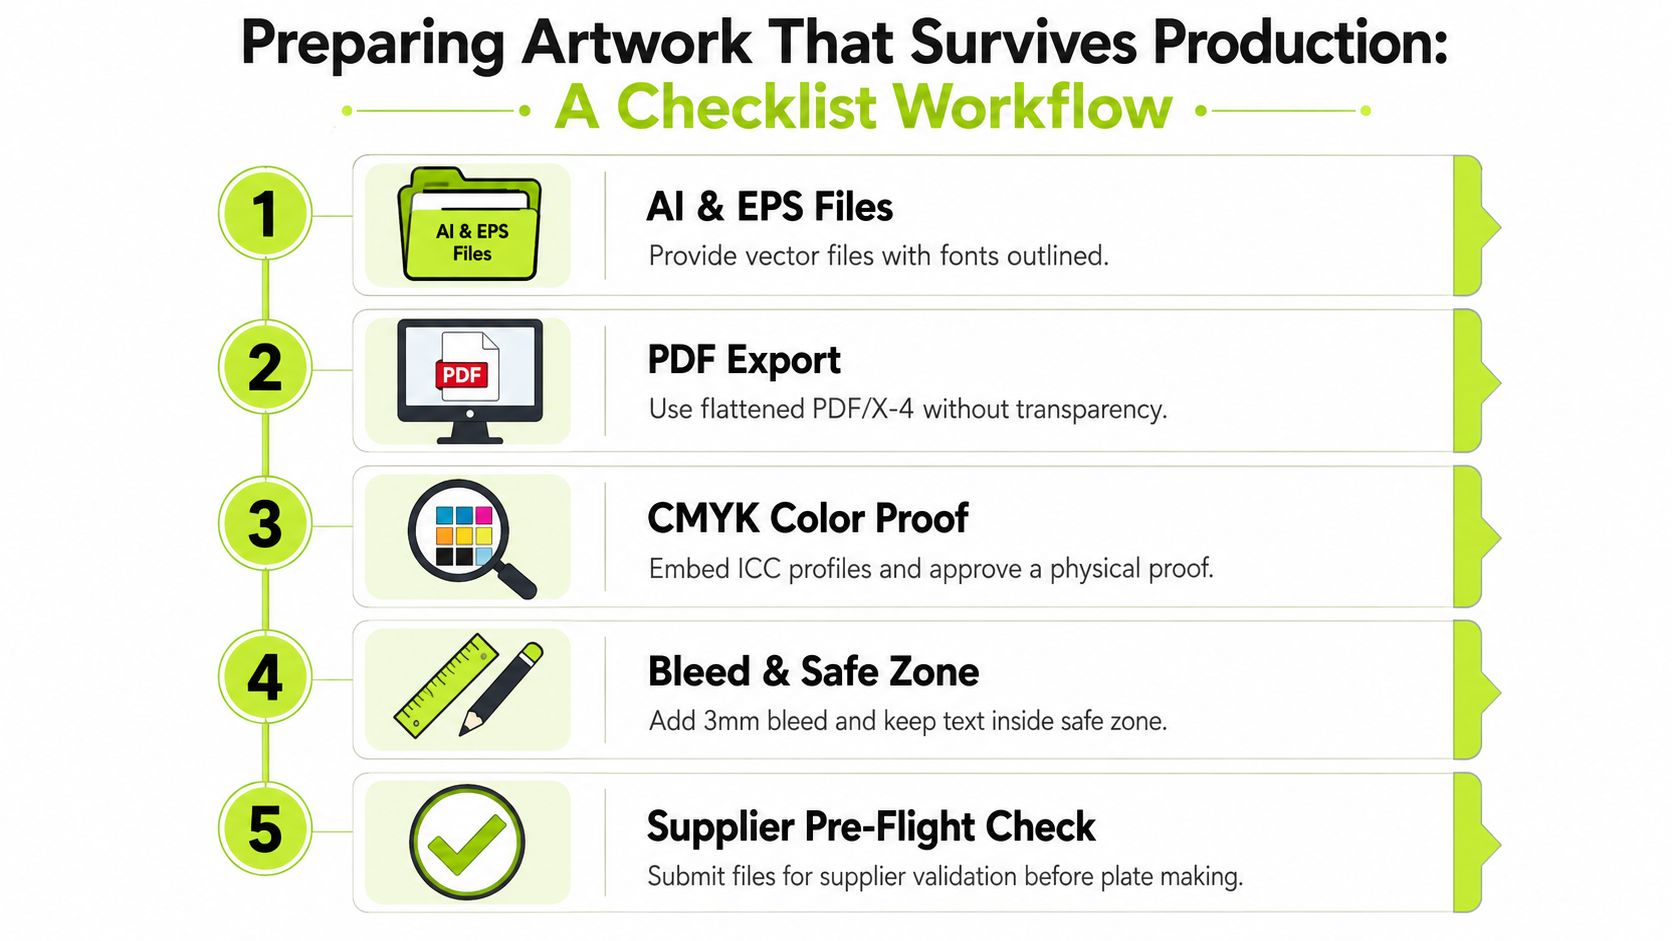
A cup rollout fails when the artwork reaches production before design, procurement, compliance, and store operations agree on the specification. Set the printable area, seam position, rim clearance, substrate color, print method, food-contact print placement, and color standard before anyone exports a final file. Keep all printed content away from areas that may contact the beverage or food.
Build the file for the press
Start with vector artwork for logos, icons, and typography. AI and EPS files are common working formats, while a properly prepared PDF can serve as the approval file. Outline fonts before handoff so the supplier does not need a missing typeface or substitute another version.
A flattened PDF is not automatically production-ready. Transparency, clipping masks, overprint settings, and unembedded images can behave differently during prepress. Ask which PDF standard the printer accepts, then request a pre-flight review. Package linked images and use high-resolution source photography for photographic panels.
Control the geometry and color
Add 3 mm bleed beyond the trim line. Keep important text, faces, barcodes, and fine details inside the supplier's safe zone. The cup seam and rim are poor locations for critical information. A design may look balanced on a flat dieline yet feel cramped or become partly hidden after forming.
Use CMYK values for process work and call out PMS references when a brand color requires tighter control. RGB files sent to a CMYK press often disappoint, particularly with bright greens, oranges, and saturated blues. Kraft or unbleached stock also changes transparent artwork because the substrate becomes part of the color mix. Specify whether the supplier needs a white underbase.
If the order includes a Hot Cup, record its plastic-free construction with an integrated folding lid and spout in the approved specification. Keep that product detail with the artwork, material, and service requirements so procurement and store operations work from the same version.
Before release, the designer and buyer should sign off on this list:
- File integrity: Vector logos, outlined fonts, embedded images, and the supplier's accepted PDF standard.
- Print area: Dieline version, 3 mm bleed, seam location, rim clearance, safe zones, and food-contact exclusions.
- Color control: CMYK or PMS callouts, substrate color, white underbase requirement, and approved proof.
- Content control: Correct logo, legal copy, barcodes, web addresses, and version number.
- Production handoff: Cup size, material, print method, quantity by SKU, and named approver.
Matching Printing Method to Your Order
Offset, flexographic, and digital printing are different production paths. Choosing among them by visual preference alone is a procurement mistake. Match the process to run length, artwork complexity, repeatability, and tolerance for setup cost.
Offset printing works on the flat cup blank before forming. It offers the strongest fit for detailed artwork, gradients, photographic imagery, and brand colors that need careful control. Industry guidance places its economical threshold at roughly 5,000 to 10,000 units, while flexography generally becomes more economical at 20,000 cups or more, as described in this custom cup printing comparison.
Flexography uses plates and suits large runs with simpler spot-color artwork. It can deliver efficient unit economics, but late artwork changes are painful because revised plates add cost and delay. Digital printing avoids plate costs and supports short runs, multiple versions, and pilot batches, but repeat orders can show more color variation and long runs usually carry a higher unit cost.
| Method | Best Run Size | Setup Cost | Color Consistency | Artwork Complexity | Typical Lead Time |
|---|---|---|---|---|---|
| Offset | Roughly 5,000 to 10,000 units and above | Plate and prepress setup required | Strong control across approved runs | High detail, gradients, photographic wraps | Supplier-dependent, allow time for proofing and setup |
| Flexographic | Roughly 20,000 units and above | Plate-based setup | Good once plates and settings are locked | Simple to moderate spot-color artwork | Supplier-dependent, efficient for repeat production |
| Digital | Short runs and versioned batches | Minimal plate setup | More inter-run variation | Moderate detail, variable messaging | Supplier-dependent, often quicker for pilots |
Make the finish serve the design
Matte varnish reduces glare and gives a restrained appearance, but it can soften perceived color. Gloss varnish makes saturated artwork feel more vivid, though reflections can make small text harder to read. Kraft stock needs an intentional color strategy, usually including a white underbase when the brand palette can't tolerate the brown paper showing through.
Curved cup surfaces also expose weak artwork decisions. Fine type, tight registration, and high-detail imagery can lose impact near the seam or narrow radius. Ask for the formed-cup proof, not only a flat digital mockup.
My recommendation: Use offset for a premium, detail-heavy identity at an economical run length. Use flexo for a stable, high-volume design. Use digital to test a concept or manage multiple localized versions, then reassess before scaling.
Minimums, Lead Times, and Proofs Without Surprises
Minimum order quantity, production time, and proofing form one schedule. A supplier's ship date means little if your artwork approval, substrate reservation, plate production, transit, and receiving window aren't written into the purchase order.
The brief's common production thresholds are useful planning references. Flexo runs often begin in the 25,000 to 50,000 units per SKU range and may require 4 to 6 weeks for production. Offset can sit in a similar volume band with additional plate setup. Digital may support minimums below 1,000 units and production windows of 7 to 14 days, but those figures and trade-offs must be confirmed in the supplier's written quote, not assumed from a generic market guide.
| Print Method | Typical MOQ | Production Lead Time | Proof Stages |
|---|---|---|---|
| Flexographic | 25,000 to 50,000 units per SKU | 4 to 6 weeks is a common planning window | Digital pre-production proof, then press proof |
| Offset | Similar high-volume range | Comparable production window, with longer plate setup possible | Digital proof, physical or press proof |
| Digital | Below 1,000 units may be possible | 7 to 14 days may be available | Digital proof, formed sample where required |
Paper-stock sourcing can add 2 to 3 weeks before printing when the supplier needs to qualify a substrate for PFAS-related requirements. That makes material approval a critical-path task. Put the approved stock name, coating, liner, ink system, and alternative-material procedure in the PO.
For flexo and offset, demand both a pre-production digital proof and a press proof. The digital proof checks content and layout. The press proof checks how ink, substrate, registration, and varnish behave together. Don't approve from a screen when the brand color is commercially important.
Schedule backward from the first store delivery:
- Confirm the in-store date and receiving window.
- Reserve time for transit and warehouse intake.
- Add the quoted production window.
- Add proof review, corrections, and written approval.
- Add substrate qualification and purchase-order processing.
- Set a firm artwork lock date.
Write the approval deadline into the PO, including who can approve and what happens if the supplier misses the agreed window. The custom printing service information can help buyers frame the questions they need to ask about branded production, but the final timeline still belongs in the supplier's quote and contract.
Substrates, Inks, and Sustainability Claims You Can Stand Behind
Treat sustainability claims as purchasing specifications, not marketing copy. Compostable, recyclable, PFAS-free, and plastic-free status depends on the fiber, coating, ink, food-contact performance, collection system, and market where the cup is sold. Design, procurement, compliance, and store operations must approve the same construction before production.
Conventional poly-coated paper remains familiar for cold drinks, but PFAS scrutiny makes material qualification a compliance task, particularly as the 2026 regulatory deadline approaches. PLA-lined and aqueous-coated boards offer alternatives, yet heat, moisture, storage, and forming performance differ. Require the supplier to name the resin or coating system. Reject vague labels such as “eco coating.”
Build a compliance dossier
For each proposed substrate, request:
- Food-contact evidence: Migration testing and a declaration covering every target market.
- PFAS documentation: A supplier declaration with supporting test information, not only a front-of-pack statement.
- Ink details: Ink chemistry, intended food-contact use, and low-migration documentation.
- End-of-life scope: The specific composting or recycling environment covered by the claim.
- Fiber certification: Documentation showing what a forestry mark covers, separate from disposal claims.
BPI compostability applies to qualifying products in industrial composting contexts. FSC certification addresses responsible fiber sourcing, not whether the finished cup composts or recycles. Regional material-recovery facilities also differ, so “recyclable” requires a market-specific basis.
EU food-contact requirements sit within Regulation (EC) No 1935/2004. India's FSSAI packaging rules restrict printed surfaces that contact food, as outlined in the FSSAI packaging compendium. Keep separate market requirements in the master specification, including print placement and any barrier between ink and contents.
A practical comparison of premium disposable cups for your brand should cover service performance and documentation, not appearance alone. For a plastic-free construction, the Hot Cup product specification describes a lid-free cup with a folding lid and spout, designed to disappear in 180 days. Record approved claims in the master file so marketing and store teams use identical wording.
Rolling Out Custom Cups Across Multiple Locations
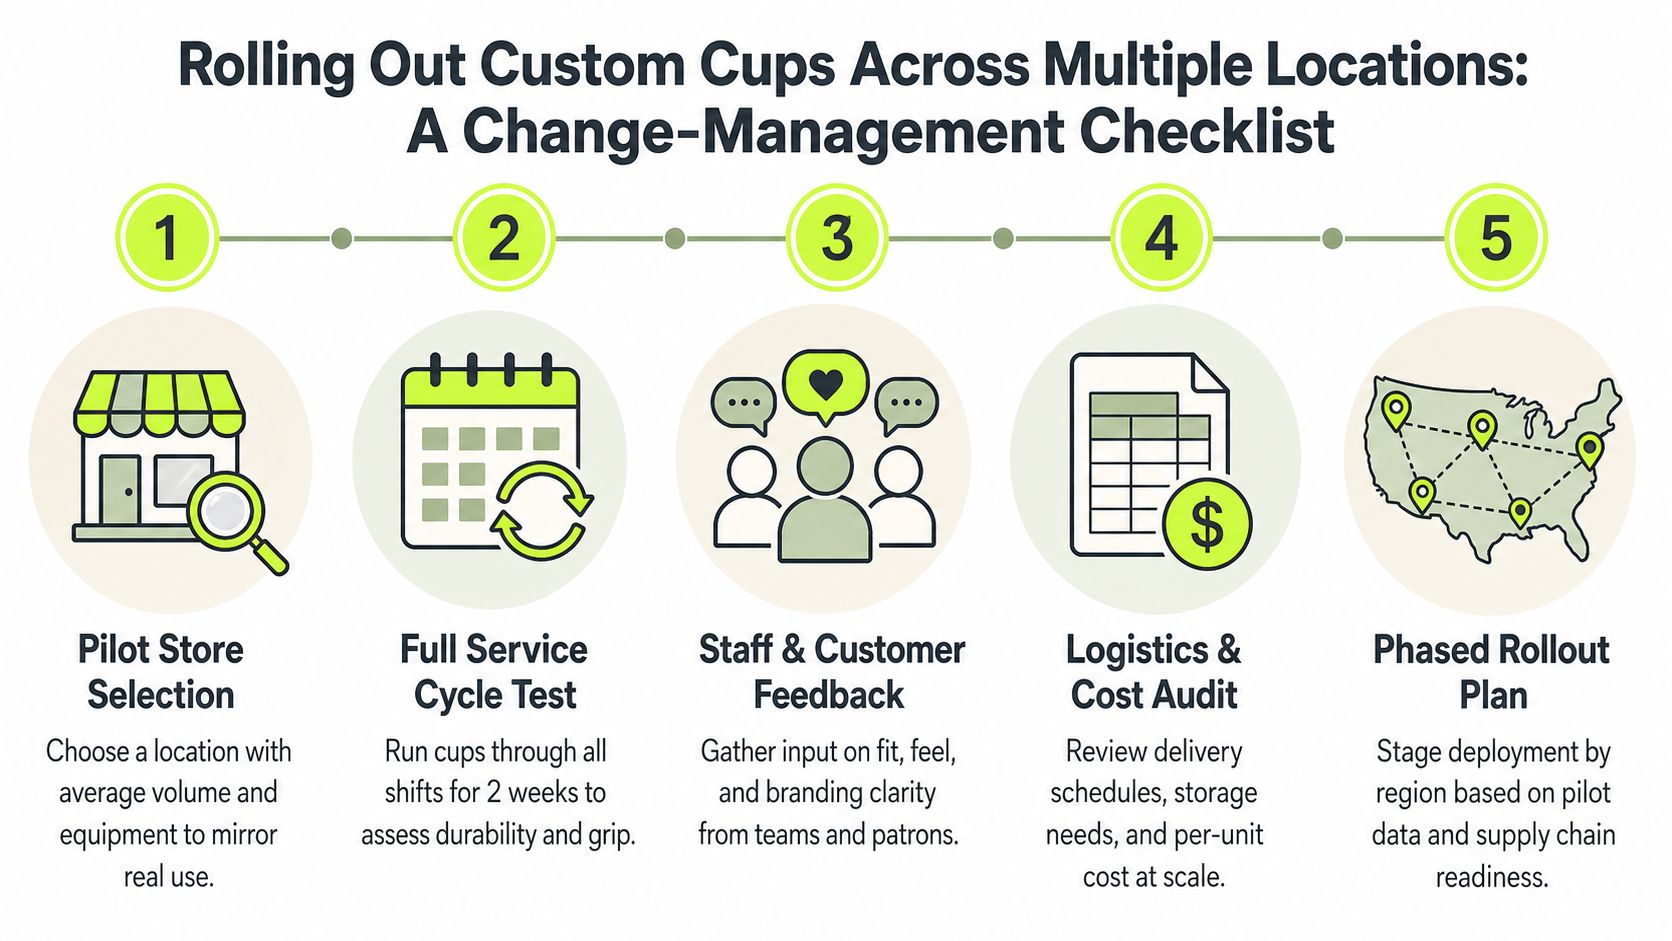
A multi-location launch fails at the store level when central teams test only the artwork. The pilot must test the complete service cycle, including cup and lid fit, filling equipment, hand feel, stacking, storage, barista speed, and customer recognition.
Choose a pilot store that reflects normal volume and equipment. Avoid selecting the flagship location because its staffing, storage, and management attention may not represent the estate. Run the cups through every shift and menu use case, then collect feedback before the next production commitment.
Use a controlled rollout
A reliable sequence looks like this:
- Select the pilot: Match average store conditions, equipment, storage, and service mix.
- Test the full operation: Check receiving, back-of-house stacking, filling, sealing, handoff, and disposal.
- Collect frontline evidence: Ask baristas about grip, fit, speed, and failure points. Ask customers whether the branding is legible and the cup feels appropriate.
- Stage by distribution hub: Roll out by region to reduce split shipments and avoid making stores hold several versions at once.
- Audit before scaling: Review quality complaints, waste, inventory behavior, and customer response before expanding.
Consolidate SKUs wherever lid compatibility allows. Every additional cup size or finish creates another forecast, storage location, reorder trigger, and chance for a franchisee to select the wrong item.
Set replenishment around each store's consumption and maintain a 14-day safety stock, as specified in the rollout plan. Don't let the supplier's MOQ dictate store ordering. Central procurement can aggregate demand while each location draws against a shared template and approved SKU list.
Give every manager one brand asset package containing the print-ready files, color standards, approved product specification, receiving instructions, and escalation contact. Finish with a 30-day post-rollout audit. If a seam issue, color mismatch, or storage problem appears, fix the system before the full estate inherits it.
The Custom Printed Cups Decision in One Page
A cup order becomes an operations decision as soon as customers see it at the counter, on the commute, or in a social post. Decide first whether the cup is a brand asset or a commodity purchase. A brand asset requires tighter control of substrate, print method, proof approval, food-contact placement, compliance records, and store execution.
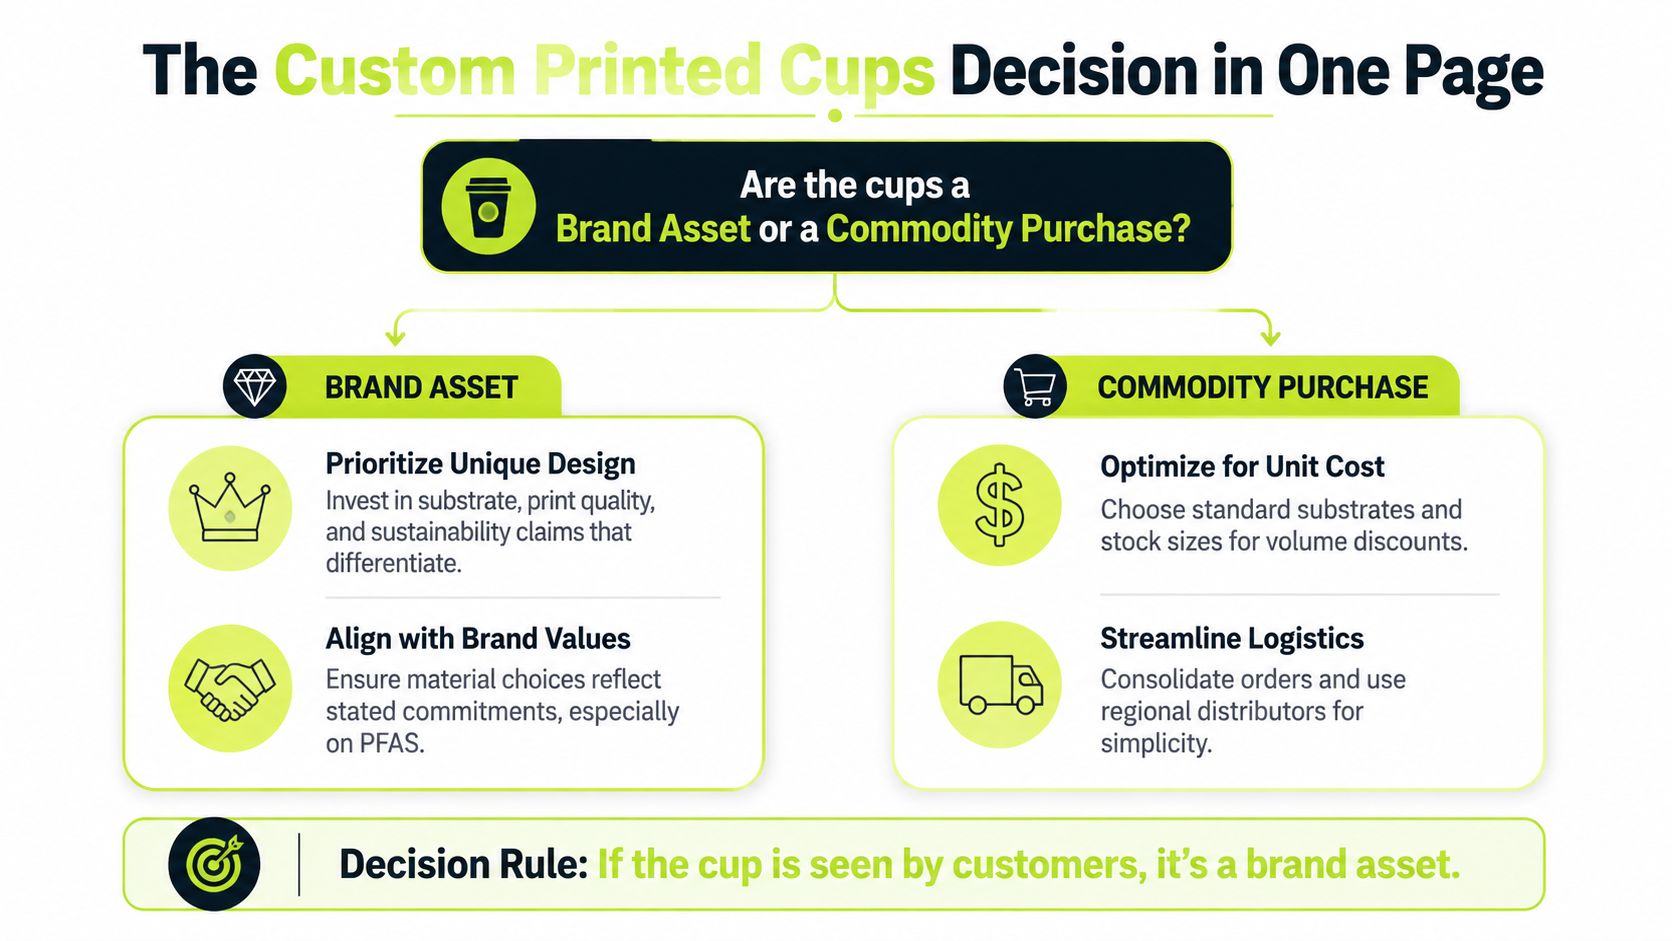
Use this five-part rule:
- Freeze the artwork specification. Request vector logos, outlined fonts, 3 mm bleed, safe zones, and approved PMS or coated CMYK references before comparing quotes.
- Match the print method to the program. Run length, color complexity, pilot size, and repeatability should drive the choice. Do not approve a method because a digital mockup looks acceptable.
- Build the schedule. Include artwork approval, proofing, substrate qualification, production, transit, receiving, and store deployment. A ship date is not a launch date.
- Clear the material file for each market. Confirm food-contact print placement, ink and coating documentation, PFAS declarations, and the exact end-of-life wording. The EU's 12 August 2026 PFAS restriction date must shape planning for food-contact packaging sold there.
- Pilot the operating model. Test a representative store through ordering, filling, handoff, storage, and disposal. Use the findings to set purchasing controls and replenishment rules.
Approve the formed sample before placing the production order. Standardize the specification, then give design, procurement, compliance, and store operations one controlled version to approve.
Nothing offers custom production for printed cups, sleeves, and straws, plus plastic-free cup formats with water-based coatings and documented material specifications. Visit Nothing to review the formats and prepare a cup brief for cross-functional approval.
